Tracking & attribution
Connect your store to Cyrqle so every creator link, click, and sale is credited back to the creator who drove it.
Attribution is how Cyrqle answers the question every brand asks: "which creator actually drove this sale?" When you connect your store, Cyrqle tags visitors who arrive through a creator's link, remembers them, and credits any purchase they make back to that creator. You set this up once per store, and from then on every campaign shows you real, sale-level results instead of guesswork.
To make it work you connect your e-commerce platform, install a small tracking snippet on your storefront, and add an order webhook so Cyrqle hears about completed orders. After that, the Attribution tab on each campaign fills in on its own.
Before you start
You need owner or admin access to both your Cyrqle workspace and your store's admin (Shopify, Magento, or WooCommerce). Have your store admin open in another tab. Cyrqle currently supports Shopify, Magento, and WooCommerce, plus custom/headless storefronts. You only need to do this once per store; if you run several stores you can connect each one independently.
How attribution works (in plain terms)
Every creator link carries a short code (it arrives on your site as ?cyq=ABC123). When a shopper clicks it and lands on your store, the tracking snippet drops a first-party cookie that quietly remembers that visitor for up to 30 days. As they browse, add to cart, and check out, those events flow back to Cyrqle.
When an order completes, Cyrqle matches it to the creator who earned the click. Matching is "last touch" within a window: the most recent creator link the buyer used inside the window gets the credit. A refund later on automatically claws that credit back, so your numbers stay honest.
Cyrqle then files the sale into a confidence tier (explained under "Read your attribution") so you can tell a rock-solid match from a softer one at a glance.
Connect your store
Cyrqle groups setup by platform. Each platform has its own page with a step-by-step checklist and the exact snippets to copy, so you mostly follow the on-screen steps and paste.
Open Integrations and pick your platform
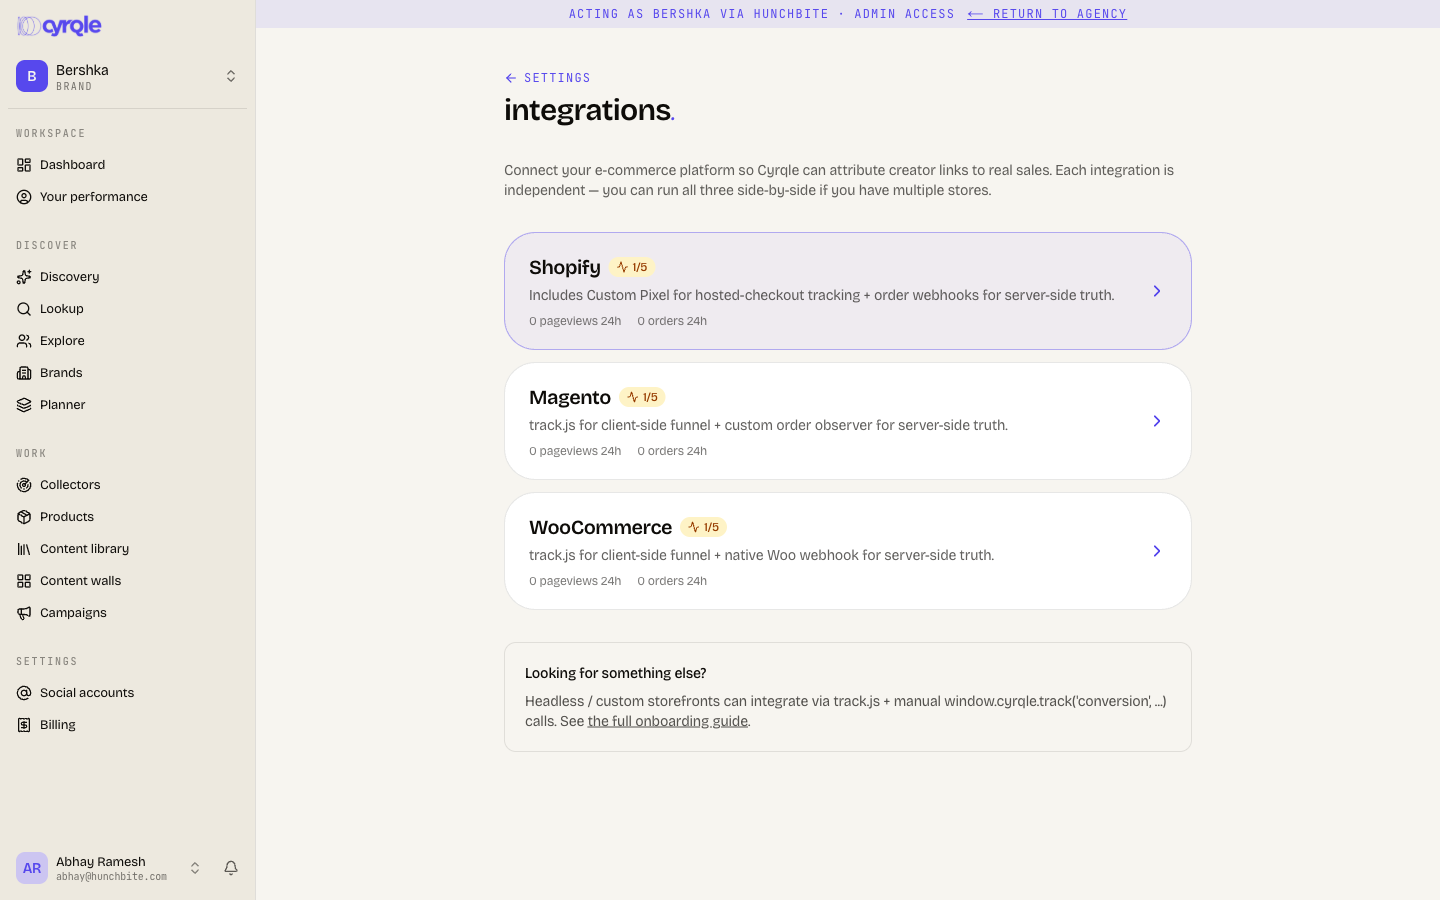
In Cyrqle, go to your workspace Settings, then Integrations. You will see a card for Shopify, Magento, and WooCommerce, each showing whether it is Live, In progress, or Not started. Click the platform your store runs on.
Create the integration
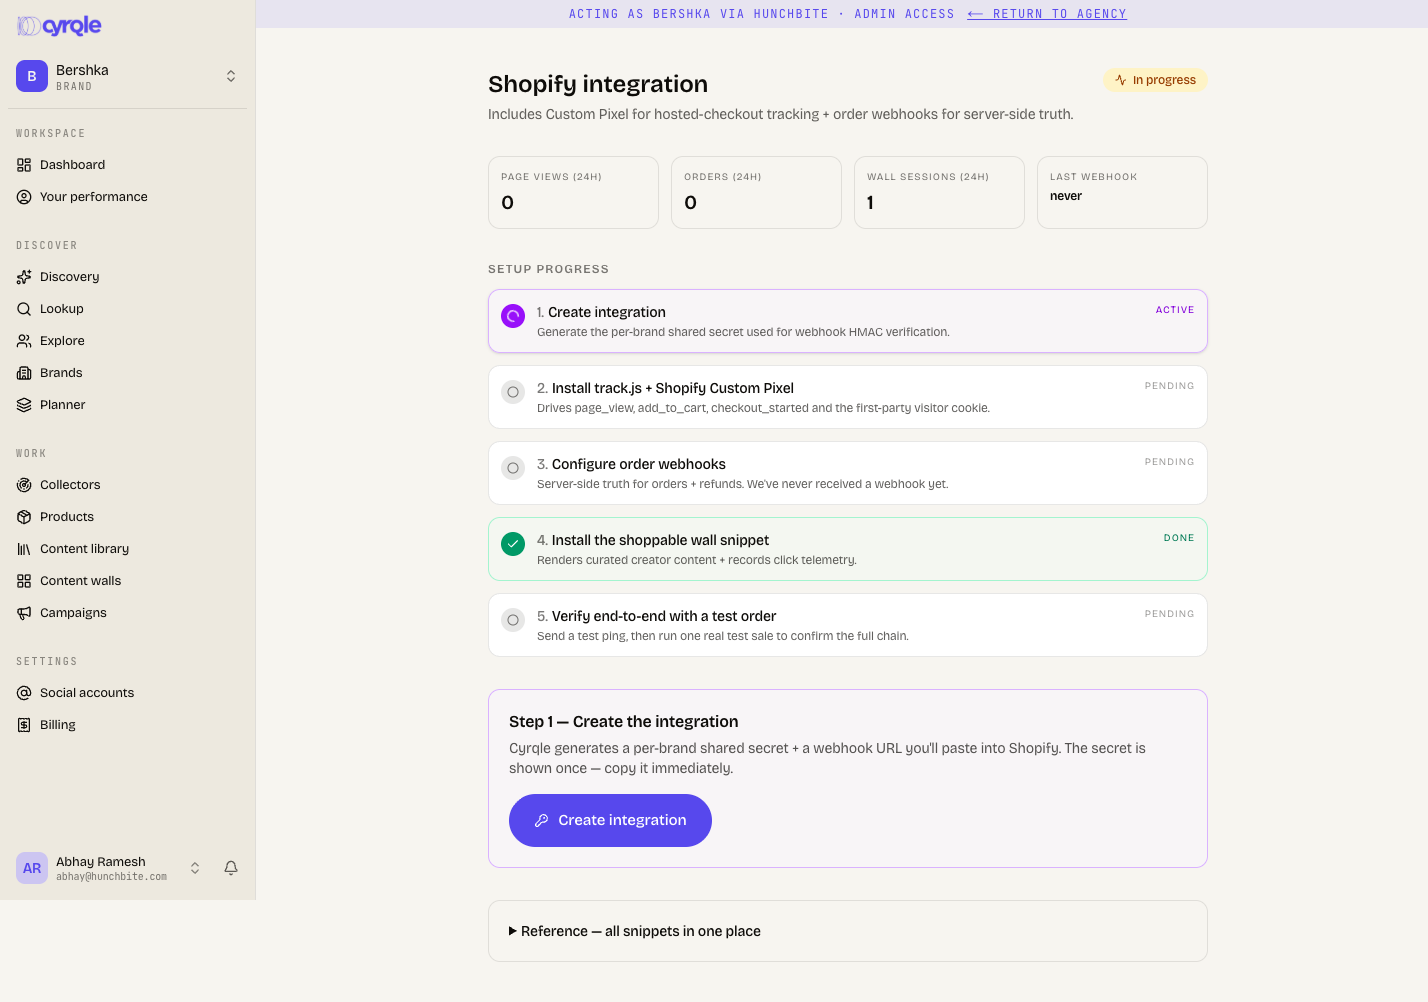
On the platform page, run Step 1 — Create the integration. Cyrqle records the connection and shows the webhook URL you will point your store at.
Who provides the signing secret depends on the platform. On Magento and WooCommerce you choose the secret, so Cyrqle generates one and shows it once — copy it into your password manager, then paste it into your store admin at the webhook step. On Shopify it is the other way around: Shopify always signs webhooks with its own secret, so there is nothing to copy here — you will paste Shopify's secret into Cyrqle at Step 3.
Install the tracking snippet on your storefront
This is Step 2 — Install track.js. Copy the snippet shown on the page and paste it into your storefront's page header so it runs on every page. The page pre-fills the snippet with your workspace, so you usually do not need to edit anything.
On Shopify you also add a Custom Pixel, which is the only approved way to observe events inside Shopify's hosted checkout. The integration page shows a five-line loader snippet with your workspace already filled in (the same pattern Google and Meta pixels use) — copy it as-is into Shopify Admin → Settings → Customer events → Add custom pixel, save, and connect. There is nothing to edit, and because the snippet loads the pixel from Cyrqle, updates reach your store automatically. Once the first page view from your site reaches Cyrqle, this step ticks off on its own.
Add the order webhook
This is Step 3 — Configure order webhooks. In your store admin, point an order webhook at the webhook URL from Step 1. Add the matching refund event too, so refunds net out automatically. The snippet tells Cyrqle about a sale from the browser; the webhook is the server-side source of truth and is what makes refunds work, so use both.
On Magento and WooCommerce, sign the webhook with the shared secret Cyrqle generated at Step 1. On Shopify, create the webhooks (Order creation, Order payment, Refund create) under Settings → Notifications → Webhooks, then copy the signing secret Shopify shows on that page and save it in Cyrqle using the platform secret field on this step — Shopify does not accept a secret of your choosing.
Add a shoppable wall (optional)
Step 4 — Install the shoppable wall renders your curated creator content on your site with built-in click tracking. Paste the wall snippet wherever you want it to appear and swap in a wall slug from your Content Walls. This is optional but recommended, since walls carry attribution automatically.
Verify end to end
Finish with Step 5 — Verify end-to-end. Use Send test ping to confirm Cyrqle can reach your webhook, then place one real test order on your store (open your store with a creator's ?cyq= code on the URL first). When the order shows up credited to that creator, you are live. The platform card flips to Live and the campaign Attribution tab starts filling in.
Conversion events and what they carry
You do not configure these by hand; the snippet and webhook send them for you as shoppers move through your store. It helps to know what each one means.
Prop
Type
Consent mode
Cyrqle is built to respect your store's existing consent settings rather than add a second cookie banner. On Shopify you choose Respect your store's consent settings when you add the Custom Pixel, and tracking honors what your shopper has agreed to. The visitor identifier is a first-party, anonymous id; buyer emails are never stored in the clear, only as a one-way hash. There is no separate consent screen to configure inside Cyrqle.
Read your attribution
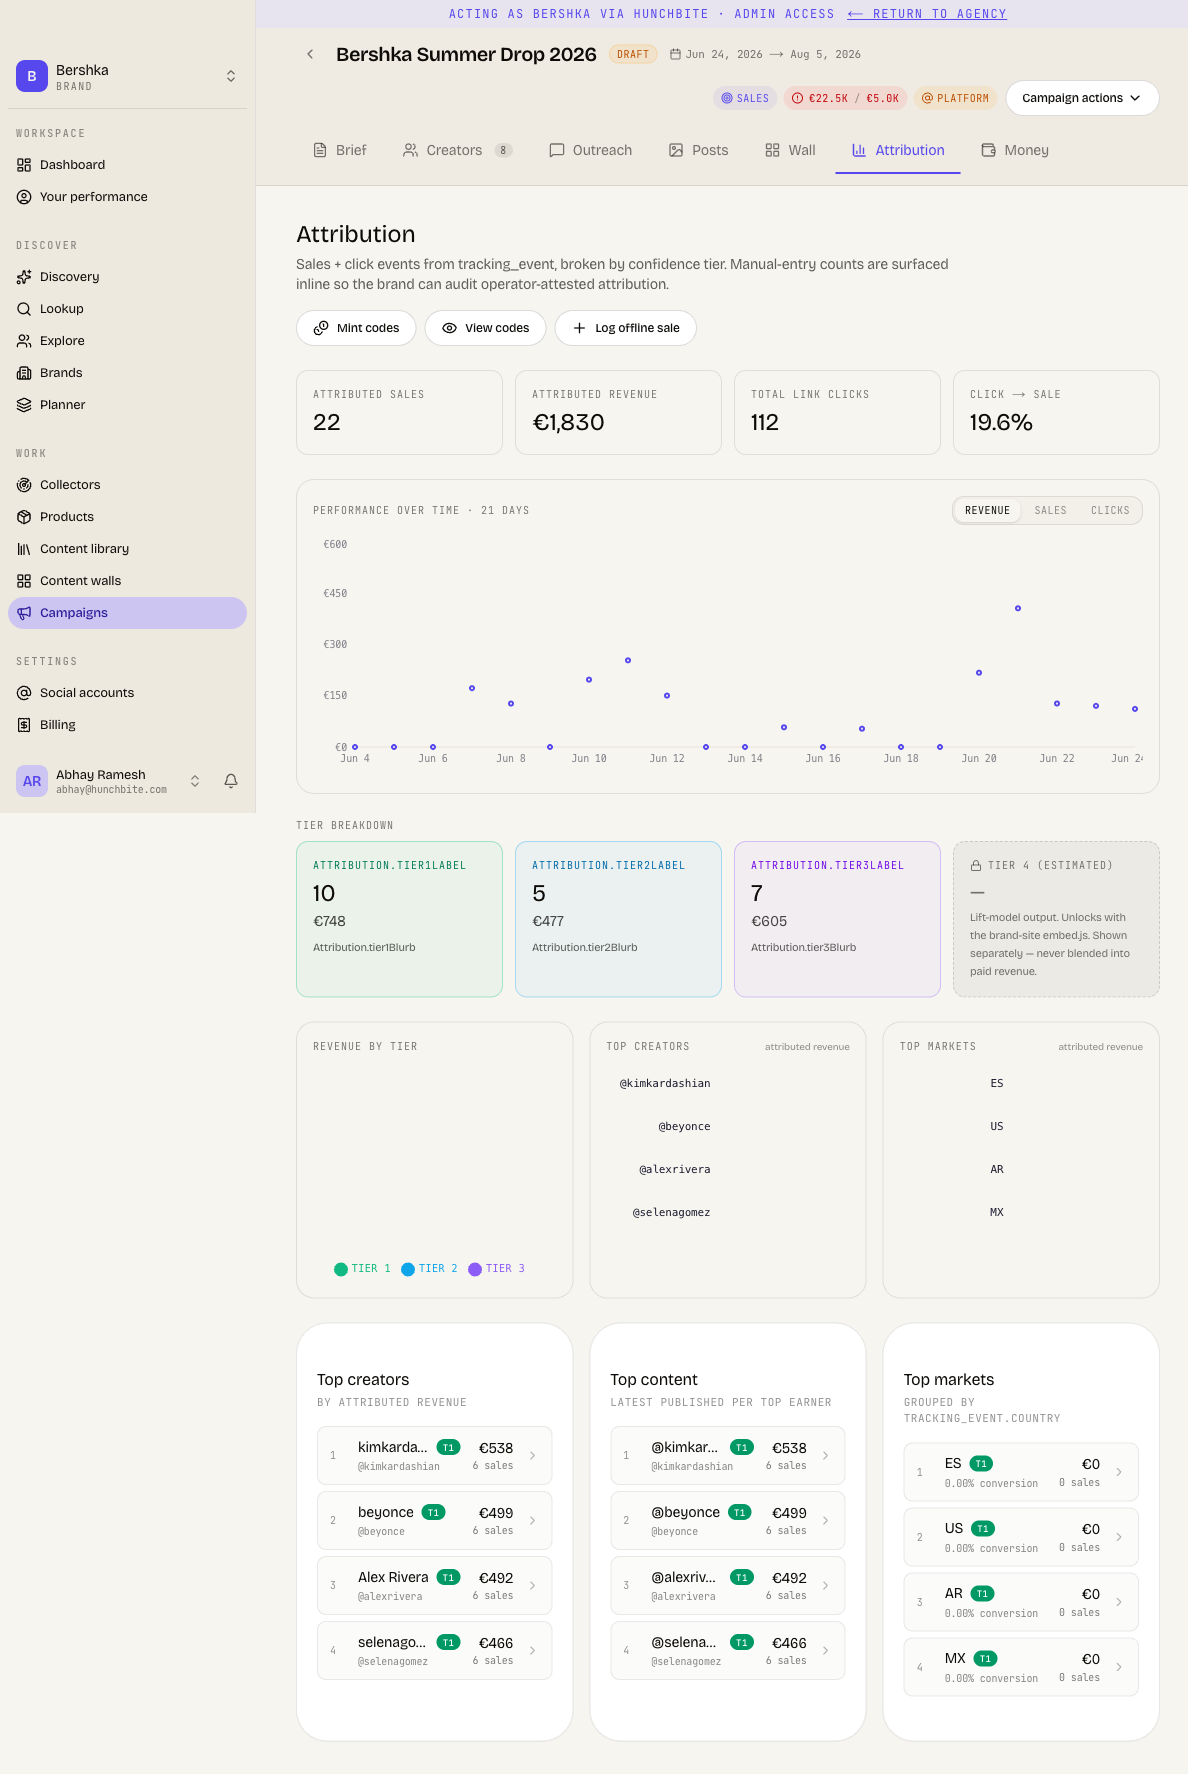
Open any campaign and go to its Attribution tab. Until sales arrive you will see a prompt to mint promo codes and install the snippet; once data flows in, the tab fills with:
- Attributed sales and attributed revenue — totals credited to this campaign's creators.
- Total link clicks and Click to sale — how many clicks the creators drove and what share turned into orders.
- A revenue-over-time chart, plus scorecards for Top creators, Top content, and Top markets (by country). Clicking a row opens the underlying audit trail for that sale.
ROAS (return on ad spend) compares the revenue attributed to the campaign against what you spent on it, so you can see whether a campaign paid for itself.
Confidence tiers
Every attributed sale is sorted into one of four tiers so you can weigh how certain the credit is:
Tier 1 — promo code
Redeemed with the creator's unique promo or discount code. The cleanest, most defensible signal.
Tier 2 — same-session
Purchase completed in the same browsing session as the creator-link click. A strong, deterministic match.
Tier 3 — cookied later
A visitor cookied on an earlier click who came back later to buy. Weaker, but still attributed.
Tier 4 — estimated lift
A modelled estimate of influence, shown separately and never blended into your paid revenue.
Manual and Phygital sales
Not every sale comes through your website, so the Attribution tab gives you two extra tools, available from the buttons at the top:
- Mint codes generates one promo code per active creator. Paste these into your point-of-sale system so an in-store redemption is credited back to the creator as a Tier 1 sale. View codes lists them all and exports them as CSV. This is how Phygital (offline) campaigns are tracked: a QR code or promo code carries the attribution into the physical world. On Shopify the same codes can also become real online discounts: once matching discounts exist in your store, a buyer who applies a creator's code at checkout is credited as Tier 1 automatically, and the
/discount/CODElink format pre-fills the coupon so the creator's audience never has to type it. - Log offline sale lets you record a sale by hand when, for example, you reconcile in-store redemptions from a report. You pick the creator (typing a promo code auto-selects them), enter the amount, choose a tier, and add a required reason note. Manually entered sales are clearly tagged as operator-recorded in the tier breakdown so they stay auditable.
Tips
- Always send creators the branded short link rather than a raw URL — it is tracked in Cyrqle independently, so you keep click data even if a shopper's browser blocks cookies.
- Install both the snippet and the order webhook. The snippet is fast but the webhook is the source of truth and is what makes refunds net out.
- If orders are not being attributed, the usual cause is the
?cyq=code being lost before checkout. Confirm the tracking snippet sits in your storefront's header so the cookie survives navigation. - Add the refund event when you set up the webhook, or refunds will not claw credit back.
- Buyer emails are stored only as a one-way hash, so attribution stays GDPR-friendly.